me & mrs. jones

diy boutique & teaching studio

  • Email
  • Facebook
  • Instagram
  • Pinterest
  • Twitter
  • about
    • shop & studio
  • workshops & events
  • gallery
  • Journal
  • contact
loading...

the kallax proposition {and ikea in memphis!}

November 16, 2016 by Mrs. Jones Admin

the gigantically-amazing blue-&-yellow swedish-meatball-purveying super-design-store is opening in memphis in a few weeks, and we can’t wait! with the building taking shape just a short hop from the shop & studio, this seems like a good time to reveal our contributions to a fun book recently out, i modify ikea. the authors challenged us to create modified versions of a kallax bookshelf and skubb boxes (post coming soon.) the kallax proposition was to turn the shelving unit on its side and make it into a sideboard or credenza.

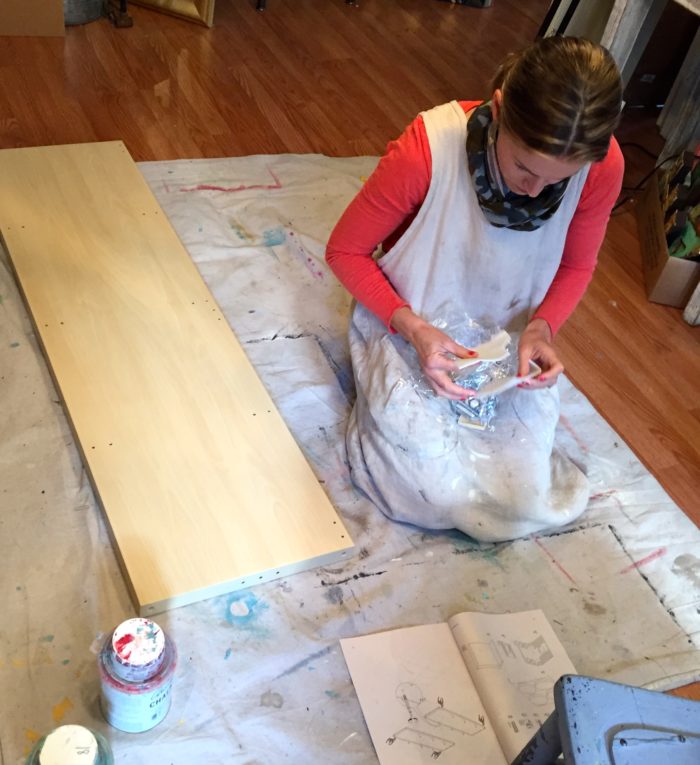
as always, step A: assemble the piece. thank goodness lauren and catherine were on hand to assist! they made quick work of it, and – huge accomplishment! – there were no parts or screws leftover…so gold stars for my girls right out of the box.

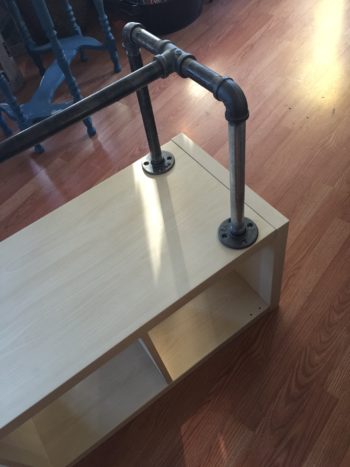
then, the fun really begins…starting with a trip to the hardware store for some basic plumbing parts. we decided to give our kallax re-do an industrial, masculine feel, from the legs up. four flanges, four elbows, two T-connectors and a handful of pipe pieces came together as a sturdy base. if you’re trying this, it doesn’t matter if you use galvanized or black parts – or even a mix of the two – since they’ll be painted. it is important, though, to remove all the stickers and to wash all the metal pieces down with a degreasing cleaner or soap, then dry them thoroughly.

setting the base in place, i made pilot holes so that i can easily secure it to one long side of the kallax once the painting is finished.

the next step is to apply a bonding primer on all the surfaces to be painted. since we’re adding gritty texture to the finish, roller marks won’t be a problem, and the foam roller saves a lot of time on large flat pieces like this one.

next come coats of metallic paint by modern masters in steel gray. (this color is one of their semi-opaque formulas, but it’s worth the extra coat or two required for full coverage.) over the steel gray, i rolled on a coat of modern masters’ oxidizing iron paint on the exterior surfaces of the piece, leaving the inside of the cubbies steel gray. if the coverage with the iron paint wasn’t perfectly perfect, no matter – having a little bit of the steel peek through will be just fine.

once the first coat of iron is dry, i attach the plumbing-pipe base with wood screw through the flanges, and then apply a second layer of the iron oxidizing paint, this time stippling it on with a gnarly old chip brush for lots of texture. (the paint is heavy-bodied, so this part is easy.)

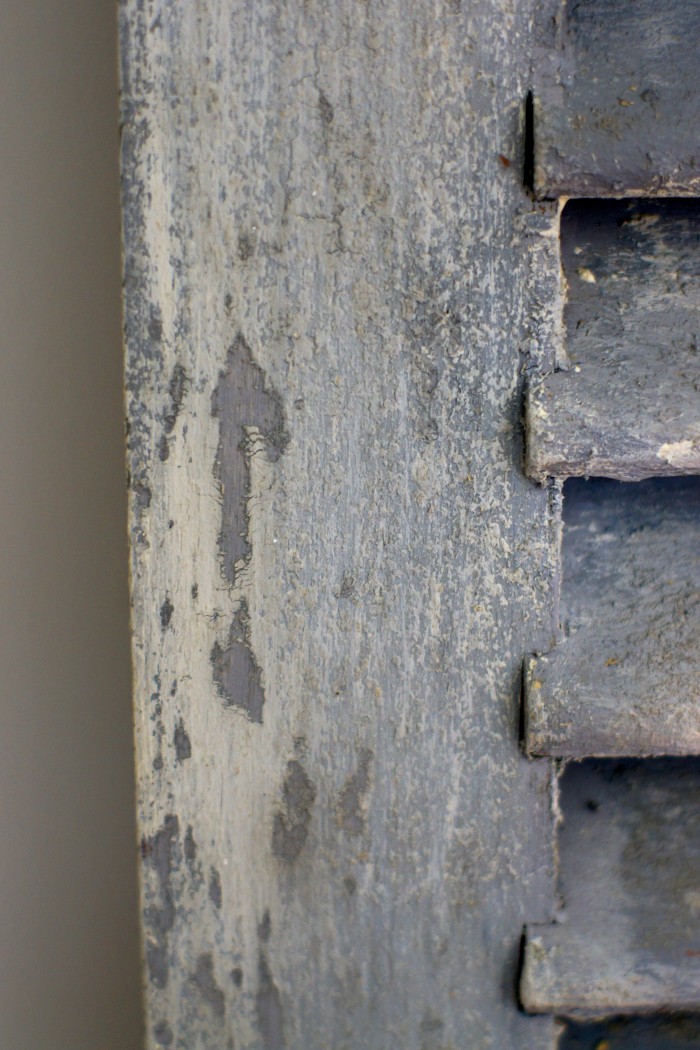
when the iron paint dries, it’s time to apply the rust patina solution (part of the modern masters reactive paint line.) we like to drip and then spritz it on, but it can be applied with a sea sponge or a brush if you prefer. because the paint contains metal particles, the oxidation process is natural and authentic, and a little bit out of your control…you just have to let it do its thing! the modern masters products are all water-based, so clean up is simple.

for this piece, we wanted it to look as if water had dripped onto it over time, so we let some of the patina solution run down the sides and front, and didn’t worry about perfect, even coverage.

while the solution is still wet, i like to spatter it with a little hydrogen peroxide…the reaction makes crazy little pitted spots in the ‘metal’ finish that’s developing. it’s a bit of a leap of faith, since you won’t know the final result until everything’s dry. depending on the humidity and how much patina solution you apply, an overnight dry is usually sufficient to let the rust ‘bloom’.

to seal the iron finish, we always use the modern masters ‘permacoat extreme’ topcoat. it arrests the patina process and protects the painted surface from wear and moisture. over the permacoat, you can use a tinted wax if you’d like to for additional toning…we love annie sloan’s dark brown soft wax when our rust occasionally turns out too bright.

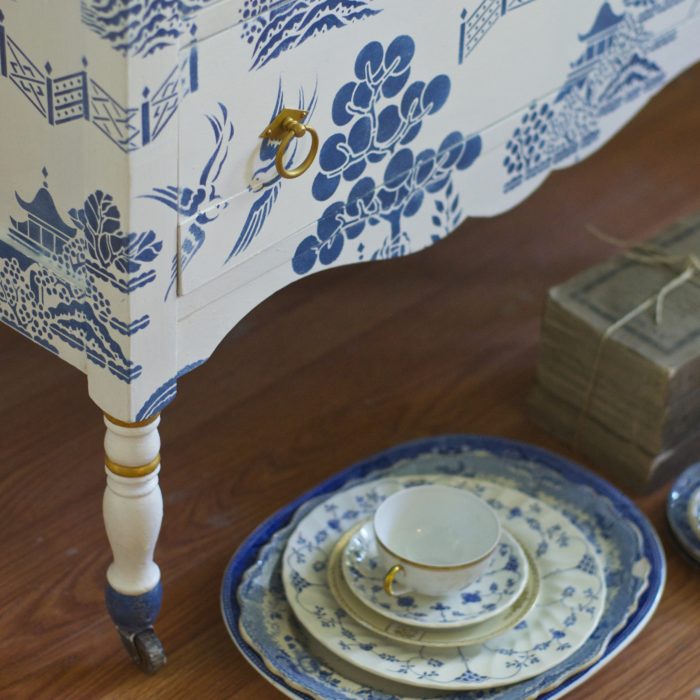
i’ll be sharing our skubb box project soon – stop by me & mrs. jones for your modern masters oxidizing paints, or to sign up for one of our patina workshops – we’d love to teach you how. for more details on this project, and 49 other inspiring ikea hacks, pick up a copy of i modify ikea at a local bookseller. do you have a favorite hack to share?

Filed Under: Before & After, In The Studio, Inspiration

blue willow…the obsession deepens

March 26, 2016 by Mrs. Jones Admin

blue willow dresser beauty shot

show of hands, please…who remembers the feature in the original (print) version of domino called ‘turn this outfit into a room’? the editors would challenge an interior designer to translate the elements of a chic clothing ensemble into a scheme for an entire space…it was a fun concept. when i saw this knockout powder room in style blueprint done by memphis designer jenna wallis, it hit me – i wanted to interpret her amazing look into a piece of furniture. here’s a link to her swank home, featuring the chinoiserie bathroom, with photos by julie wage ross.

renee scored a sweet old chest of drawers with (key!) the original casters still intact at a yard sale. (fact: mrs. jones adores wheels.) it wore a coat of yellow paint that popped off in chunks anytime we looked at it, so it sat in storage until there was time to strip the old paint. revelation – soy-gel stripper. it’s fantastically effective, and safe to use indoors. (we fell for it so hard that we now carry it at me & mrs. jones, though you can also order it here.)

blue willlow dresser - before

once the old paint was off, we sealed with white shellac-based primer…it took two coats to seal in all the old stain. the chest had an old attic-y smell, so i removed the drawers and used spray shellac to coat the inside surfaces, too. paint was next – two coats of a clean white, floated on thinly with a synthetic bristle brush, with a little water added to help the paint flow.

big blue annie

now, the fun part: stenciling! long-time readers know that mrs. jones’s all-time fave is willow pattern by stencil library. we chose a blue to replicate the china pattern. (when you’re using a distinct design like this one, it lays out best if you center the first repeat on your surface, and then work out and around, letting the pattern unfold.)

fresh willow

stencil on

the lovely folks at modern masters asked me to takeover their instagram feed for a week this spring, and this project gave me the chance to use some of their terrific products as the final layers: first, a coat of satin varnish, followed by their two-step china crackle. the crazing is most easily visible on the blue painted areas. it gives depth and interest to the finish, and is a reference to the pattern’s origins. over that is a layer of modern masters’ tintable glaze with white pigment added. one more coat of satin varnish protects the finish.

crackle close-up

on the hardware (from home depot’s online shop – fab choices! who knew?) we used modern masters’ metallic paint in olympic gold. (tip: use a metal primer first.) i was thrilled to find ring-style pulls with the diamond-shaped backplate – it echoes the pattern found in the fence on the stencil. we also used the metallic paint to pick out the bands on the legs.

SONY DSC
FullSizeRender

corner detail - blue willow

we plan to paint the insides of the drawers, but are flipping between a bright, citrus-y yellow and a deep pink. thoughts?


Filed Under: Before & After, Finds & Faves, In The Studio, Inspiration, Tips & Tutorials

a miss mustard seed-style mustard seed yellow dresser

October 25, 2015 by Mrs. Jones Admin

a few weeks ago, our dear miss mustard seed (marian parsons) posted this inspirational and informational – but most of all adorable – video:

which inspired us towards a similar style makeover of an old dresser we’d recently found out junking.

the body is done in mustard seed yellow milk paint, and the hand-painted details are in marzipan. (since i wanted to re-use the existing porcelain & brass knobs, we chose the white from miss mustard seed’s line that was closest.) meriweather did all the embellishments by hand with a small artist’s brush…she makes it look so easy!

the existing finish on the dresser caused just the perfect amount of chipping.

the top was badly water-damaged. after sanding it down, two coats of curio were applied. once the paint was dry, we used one of my favorite techniques to finish it: wet-sanding with oil. i brushed on a thin coat of hemp oil, making it as even as possible, let it sit for a few minutes, and then wiped back the excess with a paper towel.

taking a piece of 600-grit ‘wet/dry’ sandpaper, i smoothed the surface using long strokes in the same direction. (you’ll need to flip your sandpaper to a fresh side every so often, and wipe again with clean shop towels when things get messy.) more passes with the sandpaper burnish the paint and oil together, creating a smooth-as-a-baby, durable finish.

hemp oil needs a few weeks to cure – the same way other topcoats and waxes do – so be extra-gentle with those surfaces for 30 days or so. after a couple of weeks of dry time, a coat of wax can also be applied over the hemp oil for more shine and an extra measure of protection.

mustard seed yellow and curio are miss mustard seed’s colors of the month for november, so quarts are discounted all month long. come and see us!

Filed Under: Before & After, In The Studio, Inspiration, Tips & Tutorials

artissi-mo! {a dresser done in miss mustard seed’s milk paint.}

August 31, 2015 by Mrs. Jones Admin

mo artissimo

we lucked into this handsome dresser at a sale in rural mississippi. heavy and solid, it has great, simple lines, and nice details on the legs. bonus: the original casters and hardware were all intact.

denim & brass

with a little bit of a masculine feel, we thought it was a perfect piece for the yummy midnight blue that miss mustard seed calls ‘artissimo.’ renee and meredith teamed up to give it a thorough cleaning, and then two coats of paint. as we hoped it would, the milk paint crackled nicely where the old varnish was full of texture.

artissimo dresser detail

after gently distressing the edges with sandpaper, we mixed miss mustard seed’s white wax and antiquing wax in just-about-equal parts to create a pewter-y gray. it got down into the nooks, crannies, and cracks, and softened up the color just a bit. then renee used ‘antique gold’ gilding wax mixed with annie sloan’s dark soft wax to freshen up the old hardware.

a little gilt'll do ya

SONY DSC

the overall effect is like a great pair of jeans with brass buttons. some attractive little white specks showed up when we sanded it…a characteristic of milk paint. ‘levi 501’ is for sale at our midtown studio now happily installed in a stylish bachelor pad.

artissimo dresser close-up

artissimo dresser

Filed Under: Before & After, In The Studio, Inspiration

gray linen press with gilded trim

July 24, 2015 by Mrs. Jones Admin

SONY DSC

our catherine always has her discerning eye peeled for a find, and she scored huge when she spotted a bedroom suite with beautiful lines (but with a terrible paint/glaze job, and lots of damage) at a local junque dealer. cash in hand, she bought all four pieces for a song. this will give you an idea of the sort of unfortunately heavy-handed finish that had been put on the whole set:

the greenie-meanie before.

for this linen-press-style piece (the cabinet doors reveal two deep drawers inside) my studio squad teamed up to create a fabulous finish. first, after a thorough cleaning, margaret and catherine applied two coats of a beautiful blue-gray.

renee, our unofficial vp of sparkle-and-glamor, took up a tiny brush and put gilding size on all of the details and trim, gently applying the gold leaf when the size was properly tacky.

to accomplish another favorite method of ours, what we call ‘come & go gilding’, renee brushed clear shellac over the gilded areas, and then covered the whole piece with a wash of the gray paint lightened with white, using a soft cloth to create a cloudy, translucent layer.  renee blended it further with a barely-damp brush. over the details with gold leaf, we used a damp cloth to ease back the wash, revealing the softened gilding, for this beautiful ‘knocked-back’ effect.

SONY DSC

on this piece, the wash layer also softens the large flat planes, and helps camouflage some of the repairs that were made. i love the way it makes the gold leaf look as if it were lost, and then found again.

the before...

finally, we sealed the piece with clear wax, our favorite way to protect paint® and bring it to life. allowing the wax to dry overnight makes it easy to buff to this gorgeous sheen:

SONY DSC

to keep the focus on the pretty details, we painted over the inexpensive hardware, and treated it to the same wash and wax, letting it fade away. as much as we adore this press, it is available for sale at our midtown memphis studio.

Filed Under: Before & After, In The Studio, Inspiration

while you were out…

November 27, 2014 by Mrs. Jones Admin

SONY DSC

in mrs. jones’s previous work life at a bank, we took phone messages for one another on pink pads like this:

s0446094_sc7

at the studio, the girls did not leave me a message while i was traveling for a couple of days. instead, catherine, margaret, and jessica re-did a dresser…their message apparently being ‘let’s get on with it!’ here’s the before, from our favorite neighborhood junque shop:

IMG_1138

and the after:

SONY DSC

after a good wipe-down, they applied two coats of paint in one of our favorite colors, this verdigris blue.

SONY DSC

because the front of this piece is so flat, it’s a perfect canvas for some pattern. using off-white paint and lisboa tile from royal design studio, the girls created a terrific look. {a little low-tack adhesive spray on the back of the stencil keeps it in place while you’re working, and we love the faded look you get when you offload most of the paint from your stenciling brush and pounce the paint on with a very ‘dry’ brush.}

SONY DSC

a coat of clear wax seals the paint and gives it a beautiful feel.

Filed Under: Before & After, In The Studio

when in rome

November 5, 2014 by Mrs. Jones Admin

when in rome...

the jones boys recently helped clean a friends’ attic in exchange for a few pieces of furniture…a fantastic deal (for mrs. jones, at least.) one of the chests was something a novice woodworker had made, and after much puzzling, we found that each drawer only fit in one particular spot. when we finally had them right, i said ‘that’s it – we are numbering these drawers!’ to which charlie brilliantly said: ‘mom…what about roman numerals? that might look cool.’

so with a little help from my lovely friends at maison de stencils, roman number templates were soon at hand.

1 through 5 in roman, please

we used water-based paint in a deep blue, covered by a coat of dark gray…a buff off-white for the stencil, and then clear and dark brown tinted wax to seal the paint and add patina. this was a piece in progress when we held a waxing workshop at the studio, and the attendees challenged me to see how far a quarter-cup of wax would go…

using the best brush in my arsenal, i was able to get the whole dresser done with less than the allotted quarter-cup. (just ask…there were plenty of witnesses.) because the brush doesn’t absorb any wax – the way a cloth does – and the bristles are made to firmly but gently sweep the wax into the paint, you can use a very sparing amount and have an easier time of buffing with a totally gorgeous result.

after applying the clear wax, we rubbed the edges gently with 220-grit sandpaper, ‘easing’ the paint back for a bit of distressing…i had already softly distressed the stenciled pattern. then we brushed on a coat of dark brown wax to add more age.

SONY DSC

(we left the knobs ‘as is’ for contrast and warmth.)

SONY DSC

one final hint…when waxing, it’s easy to forget to let the wax dry overnight and then give it a good buffing, or polishing. but that’s when you bring up the gleam and bring the paint to life! a nice buffing also helps harden the wax and melds it together with the paint.

Image 4

Filed Under: Before & After, In The Studio, Inspiration, Tips & Tutorials

red desk for a red sox fan

October 29, 2014 by Mrs. Jones Admin

toy boat, toy boat, toy boat

it was a pleasure to paint a desk for a budding young man of letters, whose parents are clients of lovely designer {and friend} susan hughes simpson. they were inspired by a plaid chair in his room, and asked us to re-do a piece from their attic. catherine began by applying two coats of a deep earthy red. once those were dry, susan sketched out the way she wanted the ‘plaid’ to translate to the desktop, and we taped the lines off and filled in with a khaki/tan and sage-y green. a coat of clear wax, buffed to a sheen, seals and protects the paint.

red desk, all done.

detail of the plaid


Filed Under: Before & After, Inspiration

old/new/old doors

October 10, 2014 by Mrs. Jones Admin

barn doors…all done

mrs. jones has had to be away from custom work for just a bit, but a project for a wonderful neighbor was just too good to pass up. two doors down from the little pink house, an extensive renovation has been under way for several months. my neighbors had found some yummy old doors in new orleans, but the existing paint was a shambles – falling off in chunks – and had to be professionally stripped. the doors arrived at our studio bare, clean, and ready to go, but my lovely clients really wanted the crusty, crumbling look back again. a little paint, plus a secret (!) ingredient, we were able to (almost) replicate the look of years of weather upon layers of paint.

SONY DSC

a layer of wax on top of the paint gives it some protection, but we left it barely-buffed and matte for a more authentic weathered look.

SONY DSC

SONY DSC

they’ve designed a bar/storage area to be hidden behind the doors, mounted on a track, barn-style. i love their minimal-and-clean-but-rustic-and-textured-kitchen.

SONY DSC


Filed Under: Before & After, In The Studio, Inspiration

from glum to glam

January 13, 2013 by Mrs. Jones Admin

this cute but time-worn nightstand is making the transition from a grandmother’s attic to a a very stylish 9-year-old girl’s room.  before any of you mahogany/walnut/cherry-lovers out there rush to judge mrs. jones, please keep in mind that this piece was in dire need of refinishing…and isn’t it better to have it back in use, rather than hidden away in a hot, humid attic?  i truly think so…but know that there will be other opinions.  (which i hope will be kindly expressed.)  all that aside, here is the before:

my lovely client requested a high-gloss silver finish to work with lillian’s grown-up new lilac and gray bedroom scheme.  (on-site photos with the cute back-ordered crystal knobs have been promised.)  in the meantime, here is the pre-delivery after:

this piece required a little sanding to smooth out the surface.  as you know, with a glossy finish, the smallest imperfections are magnified…that little speck of something or another can end up looking like a boulder.  so, sanding and tacking away all the dust and grit is really important.

i primed first with stix, a great water-based undercoat, and then painted on two coats of modern masters’ metallic in silver.

after another sanding and wipe-down, two coats of high-gloss polyurethane went on, for the depth, shine, and durability that lillian’s mom asked for.  the poly does have an amber tone to it (which in some environments may deepen over time) but i really like the way it mellows out the silver and warms it up a little.  it’s tricky to use this topcoat over light paint colors, but over metallics it gives a nice softening effect.  i think that the brighter look really plays up the cute details on this piece.

Filed Under: Before & After, Tips & Tutorials

sneakity-peek-peeks

January 3, 2013 by Mrs. Jones Admin

previews of a few of the custom pieces in the works right now (though the final touches aren’t on yet, so i hope you’ll check back for more details soon.)

here is the before of a set of chinoiserie nightstands and dressers which my lovely client snagged at an estate sale in all their 1970’s yellow-and-red faux bamboo glory:

she asked to have them done in white high-gloss, which calls for only one thing: hollandlac brilliant.

which means, of course, an excellent excuse for a phone conversation with my colorist crush, emmett fiore at fine paints of europe.  {sigh.}  he is a smooth-color-talking hugely-hue-knowledgeable dreamboat, and i adore him.  in just a few days, a litre of her choice of benjamin moore’s white dove was on the doorstep, mixed in the only paint i know that you have to touch to see that it’s not still wet.  after no small amount of prep work (sanding, removing some yucky old sticky estate-sale stuff, filling grain with putty, using an enamel underbody, etc.) here is a glimpse…

my client has an excellent eye – these are going to be knockout in her guest room.

the final piece on deck right now is a “granny’s attic” special, being glammed up for a teenaged girl’s room…before:

here is a peek at the after:

she chose a glossy silver finish, which i’ve done here with modern masters’ silver (over a prepped surface, primed with stix) and then benjamin moore’s high-gloss polyurethane as a topcoat.  (so, yes, you really could bounce a basketball on it.)

all the final photos, plus tutorials on both of the high-gloss finishes shown here are coming shortly – please drop by again.

Filed Under: Before & After

wash & wax, please

December 15, 2012 by Mrs. Jones Admin

my lovely clients had this pair of nightstands made a few years ago.  the finish was fantastic, but in the wrong color scheme for their current look, and they were ready for something new.   hope wilkerson is working with them on a brilliant re-fresh and renovation, and their new master suite will be much more modern, lighter and cooler, in shades of white and gray.

here is the circa-1988 before:

and the beginning of the after:

the finish was done using matte paint and wax. the base coat is a bright clean white, with a wash of gray. how to do a wash, you ask?

my favorite method is to take a brush dampened with water, dip it into the paint, brush it quickly across the surface, then wipe back gently with a clean cloth. the wash settles into any texture. with the right paint, you can tweak the wash endlessly, spritzing it with water, using a damp cloth to remove more, brushing again to add back in…just get it the way you like it, and then step away for a little while.

after the paint is good and dry, seal the surface with clear wax.  (if you haven’t done this before, it’s a simple process: apply the wax with a brush or cloth to one section of your piece at a time, working it into the paint, and then wipe back the excess right away.)

the final touch my client requested was a bit of tailored detailing with pewter gilding wax.  using low-tack painter’s tape to create the “boxes”, i used my finger and a soft cloth to add the lined details.

the nightstands still await their new chunky, square crystal pulls, and their new room is not finished yet, so final photos will not be ready until after the holidays…i hope you’ll check back in a few weeks to see all the details.

{so many different color combinations make for a beautiful washed look…come by and see our samples sometime…or better yet, come to a workshop and create your own.}

Filed Under: Before & After, Tips & Tutorials

nesting tables, all lined up

November 15, 2012 by Mrs. Jones Admin

this sweet old pair of nesting tables had been in a friend’s storage unit for a long time, and just needed a good home – which mrs. jones was oh-so-happy to provide.  here they are, before:

the back leg on the bigger table had been broken and mended and broken again, and they were water-stained and tired.  still, the set is elegant and has lots of living left to do.

i have been feeling a little nostalgic for a favorite table done a while back, and wanted to repeat tobi’s sharp color combination…something about the inlaid lining details on these reminded me of that piece (which i adored, despite the tedious taping.)  i wanted to honor that original detail here, and not just cover it up.

the easiest, most efficient way to get these tables back into service was with paint and wax. after pointing kim towards benjamin moore’s seashell, she (being the brilliant mixologist that she is – she and jessica both have such an incredible knack for combining colors, it’s crazy…come by the studio and see them anytime for help, by the way!) concocted the perfect oyster sort of hue.

a nice deep raspberry-red for the lines, a little clear soft wax, a gentle rubbing-back at the edges, and it’s ready to go.

{students at our workshops know that i am a stickler for a well-worn leg on a distressed piece.  authenticity, please, people!}

Filed Under: Before & After

looking good, kimyatta

November 3, 2012 by Mrs. Jones Admin

in painting “opf” (the young joneses’ code for other peoples’ furniture, as in “mom!  there’s opf stacked up at the back door!”) over the years, i’ve found all sorts of fascinating treasures, bits, and ephemera inside armoires, dresser drawers, buffets and the like: an almost-empty flask of potato vodka and some fancy swizzle sticks, a bay city rollers album cover, the circa-1982 modeling portfolio for an aspiring young krystle carrington wannabe.  this may be the sweetest thing i’ve ever run across, though…wedged between the drawer and the bottom panel of this old china cabinet…

…was this photograph.

on the back, it says

kimyatta

birthday

“looking good”

how adorable is this?  the smile, the pigtails, the dress, the party hat, the way she is happily leaning into the picture, and the fact that someone baked and frosted a big cake and then blew up all those balloons and taped them to the wall for a birthday celebration…that is love.  i am keeping this snapshot safe as a good luck charm.

hopefully, kimyatta would like what i’ve done to try to give her family’s old china cabinet a new life beyond gary’s junque shop.  after a good cleaning and a coat of clear shellac to seal in the old stain, i mixed up some miss mustard seed’s milk paint in grain sack and gave it a first coat.  the color is a wonderful neutral, but got a little washed out against the walls.  so, i put a second layer on, this time using shutter gray, but left the medallions and the drawer sporting the grain sack.  where i sanded the paint back a little, tiny bits of the first coat show through:

in characteristic fashion, the wonderfully unpredictable milk paint left cracks, slubs, and streaks of pigment wherever it pleased (though i did rub back the edges just a bit, the crackling is all at the whims of the paint):

to brighten up the inside, i used mustard seed yellow, and stenciled the back with a little leftover grain sack and royal design studio’s fabric damask stencil.

a coat of clear wax, then antiquing wax, and mercury glass knobs from the shelves at the studio completed the re-do, one i hope is worthy of both marian and kimyatta.

Filed Under: Before & After, In The Studio

meander on in…

October 24, 2012 by Mrs. Jones Admin

…because the entryway at the studio is finally done (or done enough).  i was happy to have a few minutes the other day to sneak in and put the last touch on the stenciling, adding a gilded greek key border at the top of the walls.   because i just can’t help myself.

it’s one of a batch from the stencil library that is on its way to memphis…i am thrilled to tell you that we’ll be carrying several of their incredible, distinctive designs including the willow pattern (which, as you may know, is my all-time favorite) that’s on the walls here.  the new stencils should arrive soon.

a few process notes: i painted in the pattern first with modern masters’ pharoah’s gold, and then repeated the stenciling using gilding size.  once the size was at tack, i applied gold leaf, skipping some spots so that it wasn’t too too perfect.  (you’ll find all the details and “before” for the walls here.)

and seriously, meander your way here some time, won’t you?

Filed Under: Before & After, In The Studio

  • 1
  • 2
  • 3
  • …
  • 13
  • Next Page »

Upcoming Events

studio & shop

600 south perkins road
(adjacent to social boutique)
memphis 38117
901.494.8786
open hours: tues-fri 10-5, sat 10-2,
and by appointment or chance.

please note:

our germantown
and midtown locations merged in east memphis in 2019. we're on the southeast corner of perkins road and southern avenue, with parking and entry on the southern avenue side of the building. look for the ivy and black awnings!

in midtown? visit us within palladio antiques at 2169 central avenue, for a selection of your fave supplies!

me & mrs. jones is a diy boutique, workshop space, and working custom studio. we specialize in teaching and kitting you out for home projects, especially painted furniture, walls, floors and cabinets, along with stenciling, gilding and other embellishments. we offer a wide selection of diy supplies, furniture and fixtures, and locally-made goods. mrs. jones’s goal is to help you elevate your domestic space while exercising your creativity, with an emphasis on environmental kindness.


site by k brandon bell creative, with tons of photos by sélavie photography

Copyright © 2025 · Blossom Theme on Genesis Framework · WordPress · Log in