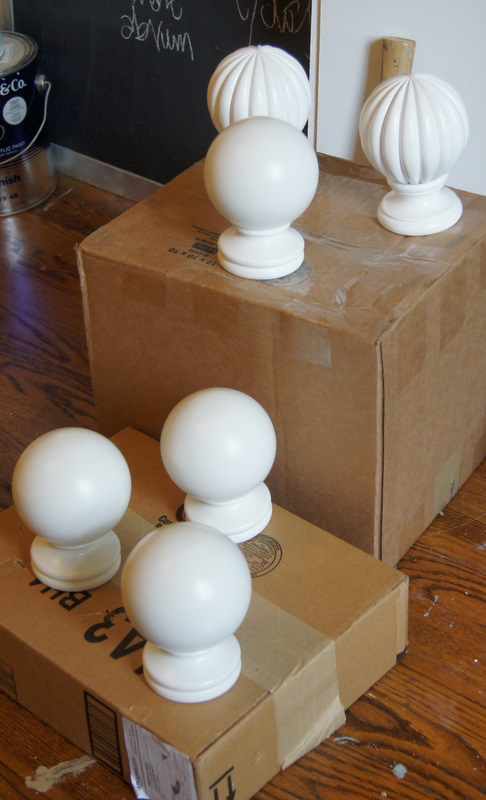
shiny new white curtain rods in this lovely teenager’s bedroom suite were just too stark against all the gorgeous, muted colors in the scheme. before:

so, after priming with stix (a water-borne bonding primer, perfect for a situation like this) i base-coated them with benjamin moore’s linen white, #912, and then brushed on some acrylic glazing medium mixed with a little dollop each of modern masters’ warm silver and platinum.

the glaze gives just a hint of color and definition, and leaves behind a pearly/metallic sheen…

…so pretty against the chocolate silk curtains.


when painting finials and rods, the biggest challenge is getting primer, paint and glaze smoothly onto all the surfaces without the pieces rolling around and getting mucked up. if you’re doing your own, here are a couple of tricks: first, using a good sturdy cardboard box flipped upside-down, make X’s a workable distance apart with an exacto knife, or some other sharp blade. punch the metal screw-ends on the finials right through each X. (this same method works well for drawer pulls and cabinet knobs, too. after removing them from your piece, re-insert their screws, and push them through the box.)

for curtain rods, secure long wood screws, or nails, in each hole. (be very careful to use screws that are the same width as the ones on the finials or narrower, so that you don’t “strip” the holes.) then, scoot your sawhorses (or chairs, or step-ladders, or whatever you can devise) together at just the right distance apart for propping. you’ll be able to roll the curtain rods in place and cover all the sides.

for the rings, using strong twine, tie each one a short distance apart through its metal eyelet (where the curtian hooks go through), and run a “clothesline” across your work space. (sorry that i don’t have a good snapshot of this.)
one other little secret: when re-hanging the curtains – after everything is really good and dry, 7 to 10 days at least – run your finger across a little paste wax , and apply it to the inside top of each curtain ring as you go, and to the inside curve on the brackets, where the rods are held in place. this helps keep the paint and glaze on the rods and rings from sticking and catching due to the weight of the curtains.
CAT says
what a difference! < beautiful and the tips are brilliant. The rod one I had not thought of and those rings are such a bear. Also fishing line is gret to use to hanging, it is very thin, very strong and inexpensive to boot. I have got to get some of that Stix. I believe you said that stix works over oiled based paint??? and Stephanie, what glaze do you like? I am always skipping around…thanks!
Cat
stephanie says
cat, you always have the best questions! i may need to do a post on glazes…! in the meantime, my all-time go-to favorite for most everything is adi-color’s GLACIS. i use that by the gallon, with their tints, to make my own. there is none better! but some situations call for adding paint to glaze (like the stippled glaze in the acre bathrooms, or the fab green walls you just did for your niece) and for that i use benjamin moore’s latex glazing medium. over oil-based surfaces, i use benj moore’s alkyd glaze, have it tinted in-store, and then tweak it with my own colorants.
and yes, the stix will work over anything, even pvc pipe and glass…you just need to make sure and give it an overnight dry, it’s not a quick-recoat kind of primer. when using it over oil-based paint, give it a light sanding & tacking first…but of course you knew that!
happy projects! xx stephanie
catherine says
Stephanie: thanks so much again for your generous sharing of information. And the props on the dining walls. Not my color, I wanted to go lighter but she was happy! I have found the BM glaze dries so fast! And I never realized that certain glazes at just for tints and/or needed latex paint added. I got some Martha stewart glaze and realized when I got home that you have to add latex paint to it. I got some ,milk paint, never tried it, and going to put it on my new potting bench but weather has been HORRIBLE here.
Cat